Clearance gem and VIM replaces TextMate!
Written by Walter on 24/1/2011
Today found out about the clearance gem. Up to now I was using login sugar but this seems much better/up to date like using formtastic views etc.
I've also switched from textmate to vim (vim works both on my debian server and os x). And it's free and basically after doing a vim tutorial and installing some plugin's it rocks even better than textmate :D. Thanks to Adam Lowe for the following tips:
Install MacVim or Gvim (For Debian based distros install with apt-get). I do frequently use terminal Vim or Vi but I like having both available. If you're on Windows you probably want to spin up a Linux box or a VM. Ruby on Rails development on Windows is going to painful.
Let's Get Plugged In
Download pathogen.vim it makes managing Vim plugins a lot simpler.
Create a ~/.vim/autoload/ directory and copy pathogen.vim into it.
$ mkdir ~/.vim
$ mkdir ~/.vim/autoload
$ cp ~/Downloads/pathogen.vim ~/.vim/autoload/
Next you need to create and edit your .vimrc file so that pathogen gets loaded in the correct order.
$ mvim ~/.vimrc

Content:
call pathogen#runtime_prepend_subdirectories(expand('~/.vimbundles'))

set tabstop=2
set smarttab
set shiftwidth=2
set autoindent
set expandtab
Create a ~/.vimbundles directory and install plugins. I prefer to clone them from github.com when I can. Some plugins still need to be downloaded from vim.org, extracted and copied to your .vimbundles directory. Either way go vote up plugins you find useful on vim.org. If you don't have git installed check out git-scm.com
$ mkdir ~/.vimbundles
$ cd ~/.vimbundles
Install rails.vim
$ git clone git://github.com/tpope/vim-rails.git
Install cucumber.vim
$ git clone git://github.com/tpope/vim-cucumber.git
Install vividchalk.vim
$ git clone git://github.com/tpope/vim-vividchalk.git
Install haml.vim (There are two. I use Tim Pope's.)
$ git clone git://github.com/tpope/vim-haml.git
Install endwise.vim
$ git clone git://github.com/tpope/vim-endwise.git
Install surround.vim
$ git clone git://github.com/tpope/vim-surround.git
Install unimpaired.vim
$ git clone git://github.com/tpope/vim-unimpaired.git
Install abolish.vim
$ git clone git://github.com/tpope/vim-abolish.git
Install repeat.vim
$ git clone git://github.com/tpope/vim-repeat.git
Install NERD_tree.vim
$ git clone git://github.com/scrooloose/nerdtree.git
Install NERD_commenter.vim
$ git clone git://github.com/scrooloose/nerdcommenter.git
Restart Vim and you now have a super powerful Rails editor at your fingertips.
First my .vimrc looked like this:
call pathogen#runtime_prepend_subdirectories(expand('~/.vimbundles'))

set background=dark
colorscheme railscasts
syntax on

set tabstop=2
set smarttab
set shiftwidth=2
set autoindent
set expandtab


autocmd VimEnter * NERDTree
autocmd VimEnter * wincmd p
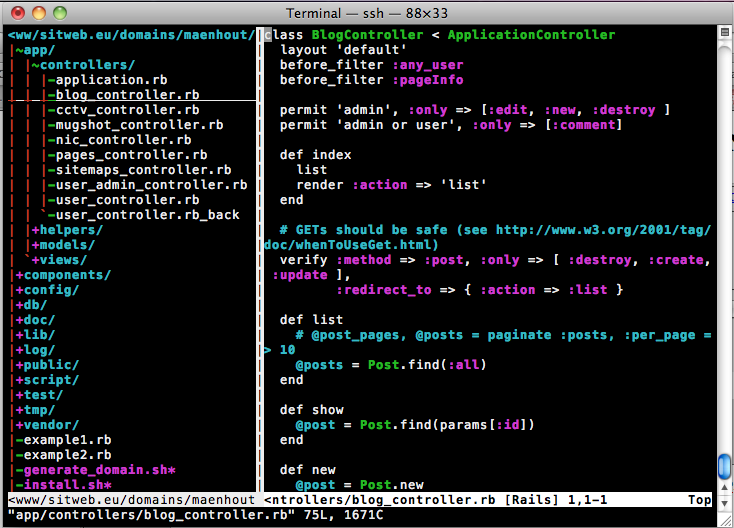
This loads pathogen, uses railscasts colors and finally auto-loads NERDTree and switches to the right slice (wincmd p, or ctrl-w w works too). Problem is not always we want vim to look like textmate.
So instead I left out the last two lines in .vimrc and made the following alias in .bashrc: alias mate='vim -c NERDTree'
Now when I go to a rails project and enter 'mate' I see something like this:
Quick reminder: cmd+shift+3 takes screenshot in os x ;).
To close and save all, I use
Have to admit it does take some time to get used to all those vim shortcuts but I found it was time to dump my good ol' joe and finally go the vim way :)
Download
My vim setup config settings: vim_settings.tar.gz